

-

-
-
Solutions
-
Soluções
-
Soluciones
-
解决方案
-
解決方案
-
الحلول
-
Product
-
Produto
-
Producto
-
产品
-
產品
-
المنتج
-

-
-


 Wati for Marketing
 Wati for Support
 Wati for Sales
 eLearning
 E-commerce
 Marketing Agencies
 Healthcare
 No Code Chatbots
 Click to WhatsApp ads
 Campaigns
 Team Inbox
 Agente de suporte de IA
How to Enable the Start Verification Button During Facebook Business Verification?
Written by:
 Ashwin Suthanthiraraj
|
Last updated on:
February 23, 2026
|
According to: Editorial Policies
Ashwin Suthanthiraraj
|
Last updated on:
February 23, 2026
|
According to: Editorial Policies
As a business owner, you understand the importance of having a strong online presence. With Facebook being a hub for over 2.7 billion users, it’s a goldmine for businesses to connect with their audience, promote products, and build brand awareness. However, to truly leverage this platform, undergoing Facebook Business Verification is crucial. This process not only boosts your page’s authenticity but also unlocks advanced features that are pivotal for your marketing and engagement strategies.
But what happens when you’re ready to verify your business on Facebook, and you can’t seem to find or enable the ‘Start Verification’ button? This can be a puzzling and frustrating hurdle. In this guide, we’ll walk you through why this issue arises and how to resolve it, ensuring your journey towards Facebook Business Verification is smooth and successful.
So, let’s dive into the world of Facebook Business Verification together, where your journey to a verified business presence on Facebook begins. Get ready to unlock your business’s full potential on this vast social network!
What is Facebook Business Verification?
Facebook Business Verification is a process that confirms the authenticity of a business on Facebook. It is essential for businesses that want to access advanced features like the WhatsApp Business API. Verified businesses are granted API access and enjoy a higher level of trust from their customers.
Why is Facebook Business Verification Important?
Facebook Business Verification is crucial for the following reasons:
- WhatsApp Business API Access: Verified businesses can access the WhatsApp Business API, which allows them to communicate with their customers through the popular messaging platform.
- Increased Trust: A verified business appears more trustworthy to potential customers, as it has been vetted and approved by Facebook.
- Access to Advanced Features: Verified businesses can access advanced Facebook features that are not available to unverified businesses, such as ad account creation and management.
Common Issues with the Start Verification Button
Incomplete Business Page Information
If your Facebook Business Page lacks essential information like your business address, contact details, or a clear description of your services, the ‘Start Verification’ button may not appear. Facebook needs complete and accurate information to consider your business for verification.
Recent Changes to Your Business Page
Did you recently update your business information on your Facebook page? If so, there might be a brief waiting period before the verification option becomes available again. Facebook often requires time to process these changes.
Previous Verification Attempts
If you’ve previously attempted to verify your business and were unsuccessful, this could temporarily disable the verification button. Review the feedback from Facebook on your previous attempts to understand what needs to be corrected.
Eligibility Criteria Not Met
Facebook has specific eligibility criteria for business verification. This includes factors like the type of business, the country your business operates in, and the level of public interest in your business. Make sure your business aligns with these criteria.
Policy Compliance Issues
Your business must adhere to Facebook’s policies and community standards. If there are any violations or unresolved issues, the ‘Start Verification’ button may be disabled until these are addressed.
Technical Glitches
Sometimes, the issue could be as simple as a temporary technical glitch on Facebook’s end. In such cases, trying a different browser, clearing your cache, or waiting a bit before trying again can help.
Lack of Admin Rights
Only page admins can initiate the Facebook Business Verification process. Ensure you have admin rights to your business page. If you’re not an admin, you won’t see the option to start verification.
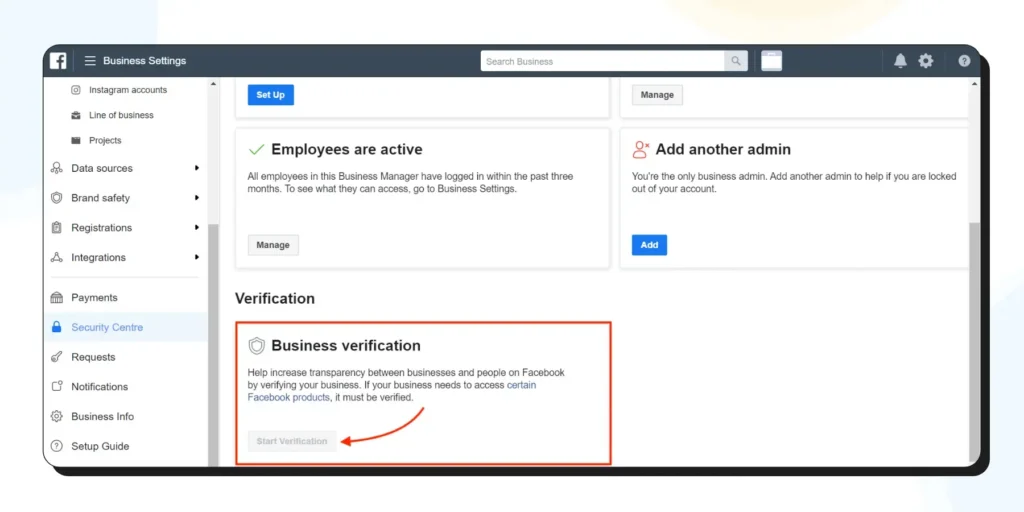
Steps to Enable the Start Verification Button for Facebook Business Manager Verification
Follow these steps to enable the Start Verification button if it is greyed out or not visible:
Step 1: Complete Your Business Information
Ensure that your Business Information is complete in your Facebook Business Manager account. This includes adding your business address, contact information, and website.
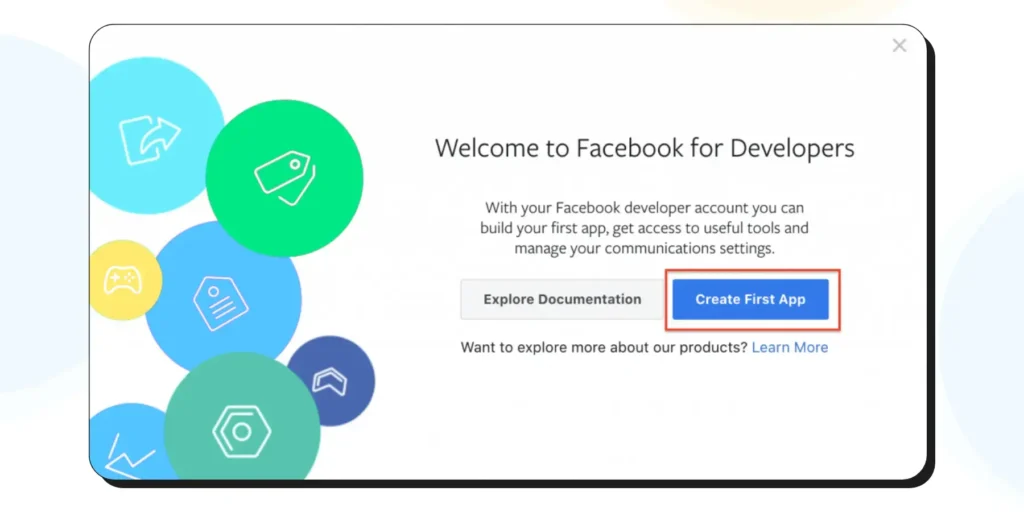
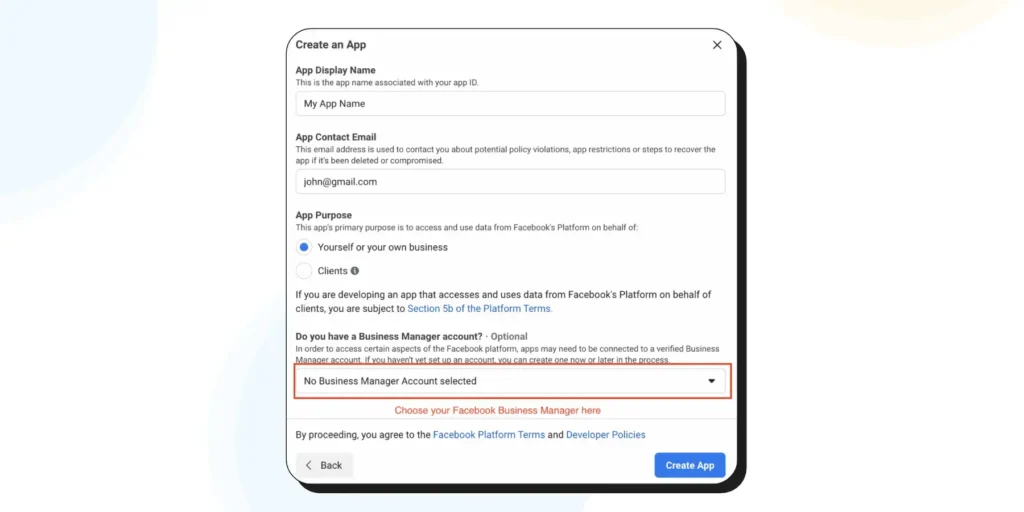
Step 2: Create a Facebook Developer Account
To enable the Start Verification button, you need to create a Facebook Developer account using the same email address that you used to register your Facebook Business Manager account.
- Go to the Facebook Developers page.
- Click on ‘Get Started’ or ‘My Apps’ in the top-right corner. Click on ‘Create an app.’
- Choose any option from the next pop-up and click ‘Continue.’
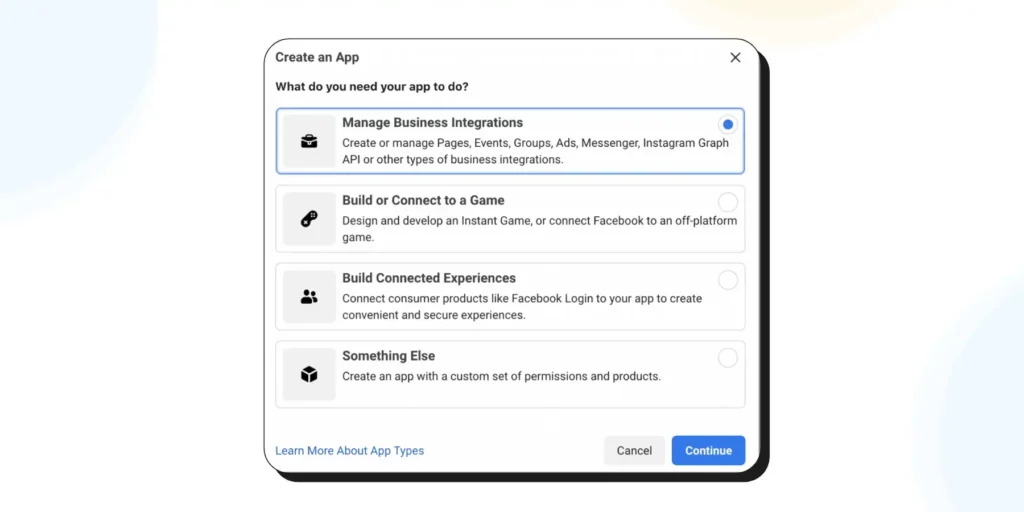
- Add your app name, email address, and purpose. Choose your Facebook Business account from the dropdown (this is important). Click on ‘Create App.’
Step 3: Link the Facebook App to Your Business Manager
- Go back to your Facebook Business Manager’s Security Center.
- The Start Verification button should now be enabled.

Step 4: Complete Facebook Business Verification
Now that the Start Verification button is enabled, you can proceed with the Facebook Verification process.
For a detailed guide on the verification steps, you can refer to this article .
Additional Tips
Here are some additional tips to ensure a smooth Facebook Business Verification process:
- Use a Consistent Email Address: Make sure you use the same email address for your Facebook Business Manager account, Facebook Developer account, and app registration. This will help avoid confusion and potential issues during the verification process.
- Check for Updates: Keep an eye on the Facebook Developers page for any updates or changes to the verification process. Facebook frequently updates its platform, and staying informed will help you avoid potential issues.
- Be Patient: The Facebook Verification process can take anywhere from a few hours to several days. Be patient during this time and regularly check your email for any updates or requests from Facebook.
Pre-Requisites for Facebook Business Verification
Before diving into the Facebook Business Verification process, it’s important to ensure you have all the necessary elements in place. Think of these prerequisites as the foundation for your verification journey. As a business owner, ticking these boxes will smooth out the path ahead and significantly increase your chances of a successful verification.
Valid Business Documentation
The cornerstone of Facebook Business Verification is valid documentation. Ensure you have official documents that clearly show your business’s name and address. This could be a utility bill, a business license, or tax documents. The key is to provide proof that your business is legitimate and operational.
An Up-to-Date Business Page
Your Facebook Business Page should accurately reflect your current business operations. This means your contact information, business description, and operating hours need to be up-to-date. A well-maintained page not only aids in verification but also builds trust with your audience.
Consistent Business Information
Consistency is key. The information on your Facebook Business Page should match the details in your official documents. Any discrepancies can cause delays or even rejections in the verification process.
Business Page Admin Access
To initiate the verification process, you need to be an admin of the Facebook Business Page. If you’re not, request admin access from the current page administrator.
Compliance with Facebook’s Policies
Ensure your business and its Facebook activities comply with Facebook’s Community Standards and Terms of Service. Violations can hinder your verification process.
A Public-Facing Business Presence
Your business should be publicly accessible and visible. This means having a physical location or a publicly listed phone number and email address.
Meeting these prerequisites sets you on the right track for Facebook Business Verification. It shows Facebook that your business is authentic and ready to engage responsibly on their platform.
Gather All Necessary Documents Beforehand
Before starting the verification process, collect all the required documents. This typically includes official business documents like registration certificates, tax documents, or utility bills. Having these at hand ensures you don’t hit a roadblock once you start the process.
Ensure Information Accuracy
Double-check that all the information on your Facebook Business Page and your official documents is accurate and matches perfectly. Discrepancies between your page information and your official documents are one of the most common reasons for delays in verification.
Understand Facebook’s Verification Criteria
Familiarize yourself with Facebook’s criteria for business verification. Ensure your business meets these standards, including adherence to Facebook’s community standards and terms of service.
Maintain a Professional Online Presence
A well-maintained, professional Facebook page can improve your chances of successful verification. Regularly update your page with relevant content, and ensure your business’s public profile is complete and engaging.
Be Prepared for Follow-Up
Sometimes, Facebook may request additional information or clarification. Be ready to respond promptly to any inquiries or requests from Facebook to keep the process moving.
Be Patient
The verification process can take time, ranging from a few days to a few weeks. Patience is key. Avoid repeatedly submitting your verification request, as this can further delay the process.
Seek Help if Needed
If you encounter difficulties or have questions, don’t hesitate to consult Facebook’s Help Center or reach out to their support team for assistance.
Keep Your Business Information Updated
Even after verification, it’s important to keep your business information on Facebook up to date. Significant changes in your business details might require re-verification.
By following these best practices, you can significantly enhance your experience and success rate with Facebook Business Verification.
Conclusion
Enabling the Start Verification button during Facebook Business Verification is a crucial step for businesses that want to access advanced features like the WhatsApp Business API. Following the steps outlined in this guide, you can successfully enable the Start Verification button and complete your Facebook Business Verification process. If you still encounter issues, consider seeking assistance from a verified WhatsApp Business Partner like Wati.
Frequently Asked Questions
What is Facebook Business Verification?
Facebook Business Verification is a process where Facebook confirms the authenticity of a business operating on its platform. It involves submitting documentation to prove your business’s legitimacy, which, upon approval, grants your business page a verification badge. This enhances credibility and can unlock additional features on Facebook.
Why is my ‘Start Verification’ button not visible?
The ‘Start Verification’ button may not be visible if your business doesn’t meet certain criteria set by Facebook, if you haven’t completed all the required fields on your business page, or if there are previous verification attempts pending. Ensure all information is accurate and up to date to enable the button.
What documents are needed for Facebook Business Verification?
The documents required vary depending on your business type and location, but generally include official documents that show your business’s name and address, such as utility bills, tax files, or incorporation papers.
How long does Facebook business verification take?
The time frame for verification can vary. Typically, it takes a few days to a few weeks. The duration depends on the accuracy of the documents provided and Facebook’s review process.
Can I expedite the Facebook business verification process?
Currently, there is no official way to expedite the process. It’s important to submit accurate and clear documentation to avoid delays.
What should I do if my verification is denied?
If your verification request is denied, Facebook will usually provide a reason. Address the specified issues and reapply. Ensure all information is accurate and your documents are up to date.
Is Facebook Business Verification mandatory?
It’s not mandatory for all businesses, but it is required for access to certain Facebook features and tools, like the WhatsApp Business API or political advertising. It also adds credibility to your business page.
Can I change my business information after verification?
Yes, you can change some information, but significant changes, like a change in business name or address, may require re-verification.