
Too Long? Read This First
- Creating click-to-WhatsApp ads takes three phases: link and verify your WhatsApp Business account, set up the campaign in Meta Ads Manager, and configure the conversation opener.
- Choose Engagement or Leads as your objective. Traffic optimizes for clicks, not conversations, and quietly wastes budget.
- The step most guides skip: the message a user sees when WhatsApp opens. Meta's default, "Hello! Can I get more info on this?", works but gives your team nothing to act on.
- Your WhatsApp number has to be linked and verified on your Facebook Page before Ads Manager will even show WhatsApp as a destination.
- Getting the setup right is only half the job. What happens in the first reply is what decides whether a click becomes a conversation.
Creating click-to-WhatsApp ads looks simple from the outside: pick an objective, connect a number, and publish. Most setup guides stop there.
What they skip is the part that determines whether your ad actually generates conversations rather than clicks that go nowhere.
The pre-filled message a user sees the moment WhatsApp opens, and the account-linking work that has to happen before Ads Manager will let you choose WhatsApp as a destination at all.
Miss either one, and you'll publish a technically correct campaign that still underperforms.
Here's the full setup, in order, including the two steps everyone else buries or skips.
What Do You Need Before You Open Ads Manager?
Before you can create click-to-WhatsApp ads, three things need to be in place: a WhatsApp Business account, that account linked and verified on your Facebook Page, and a valid payment method on your ad account.
Skip any of these, and WhatsApp won't even show up as an option when you get to Ads Manager.
Most CTWA setup problems don't happen inside Ads Manager at all. They happen here, before you've clicked a single thing.
Your pre-launch checklist:
- A WhatsApp Business account. Either the free WhatsApp Business app or the WhatsApp Business API, connected through Wati or another provider. Personal WhatsApp numbers aren't supported for click-to-WhatsApp ads, full stop.
- A Facebook Page for your business/ CTWA ads runs through a Page, not a personal profile.
- Your WhatsApp number is linked to that Page and verified. Go to your Facebook Page → Settings → WhatsApp, enter your country code and number, and confirm the OTP Meta sends you. Until this link is live, the WhatsApp destination option simply won't appear at the campaign level.
- Admin access to both the Page and the Meta Business Manager account you're advertising from.
- A payment method already added to your ad account, with no restrictions or holds on it.
- Your WhatsApp Business account, Page, and Business Manager all sitting under the same Meta Business Manager, not split across separate ones. Mismatched accounts are the single most common reason a CTWA setup breaks before it starts.
If you're not sure whether you need the app or the API for this, the short version: the app is fine for testing and low weekly volume.
The API is worth it once you're past a few dozen conversations a week and want automation or CRM routing.
Once every box above is checked, you're ready to actually set up WhatsApp ads inside Ads Manager. That's where the next section picks up.
How Do You Set Up the Campaign in Meta Ads Manager?
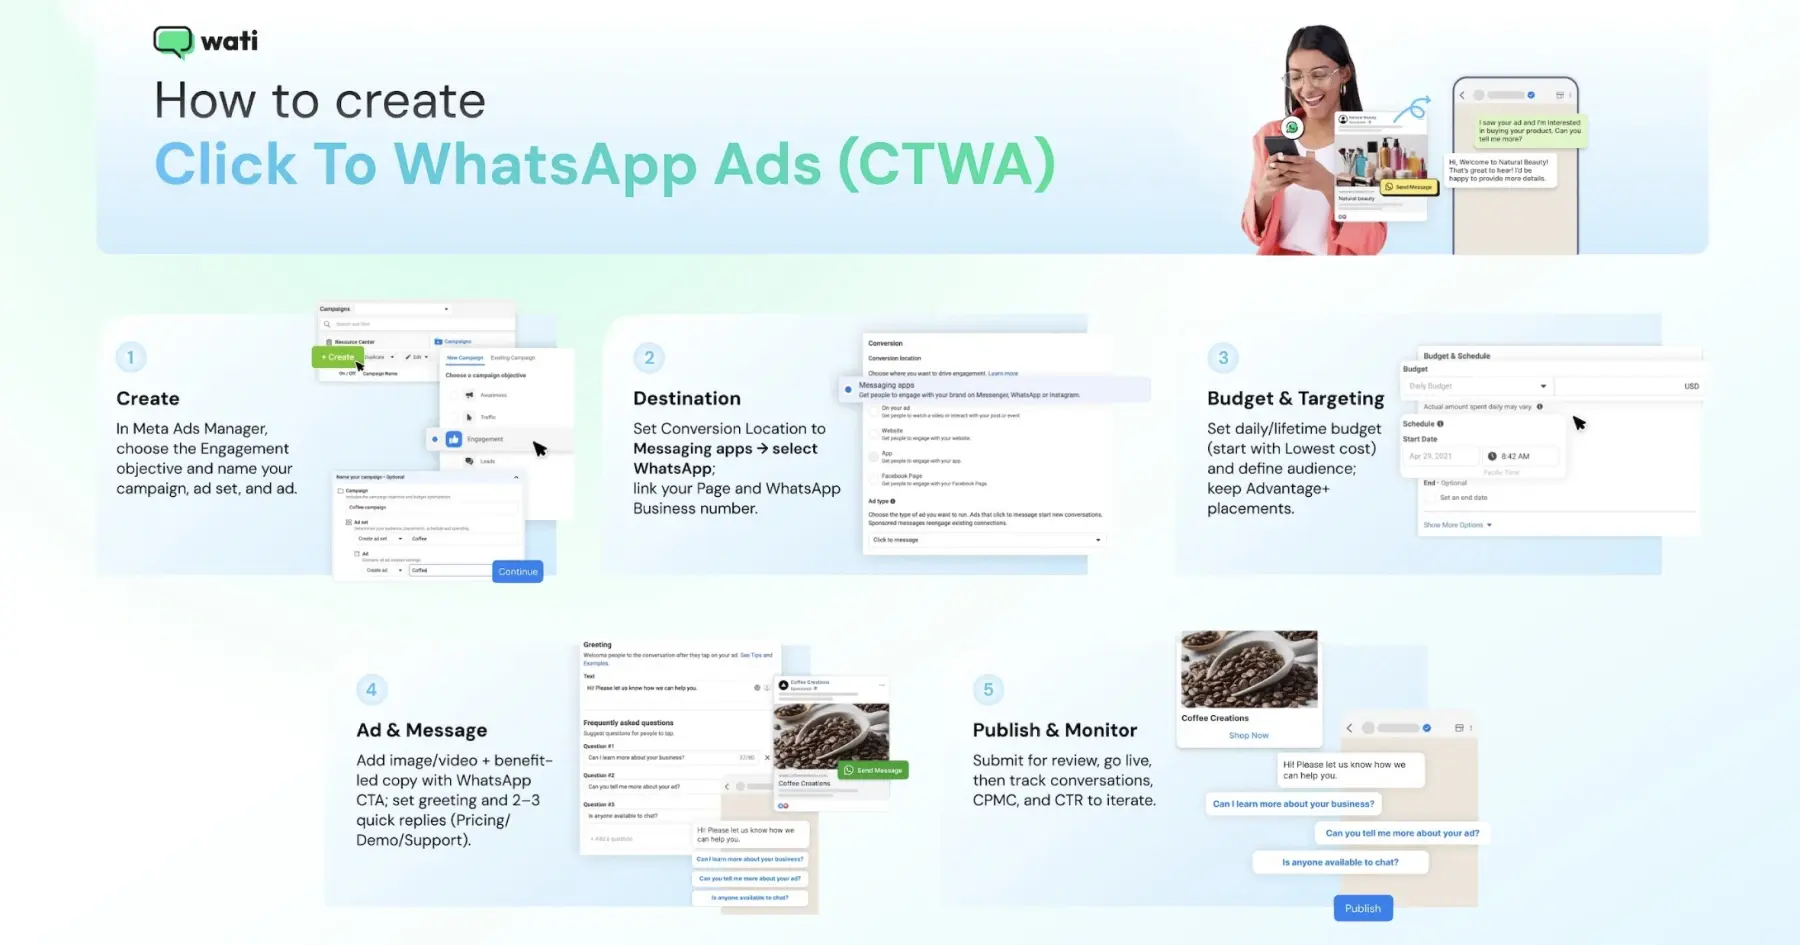
Once your account requirements are in place, creating click-to-WhatsApp ads takes five steps inside Ads Manager: objective, conversion location, budget, audience, and creative. Here's the full sequence.
Step 1: Create the Campaign and Choose Your Objective
- Go to Meta Ads Manager and click Create.
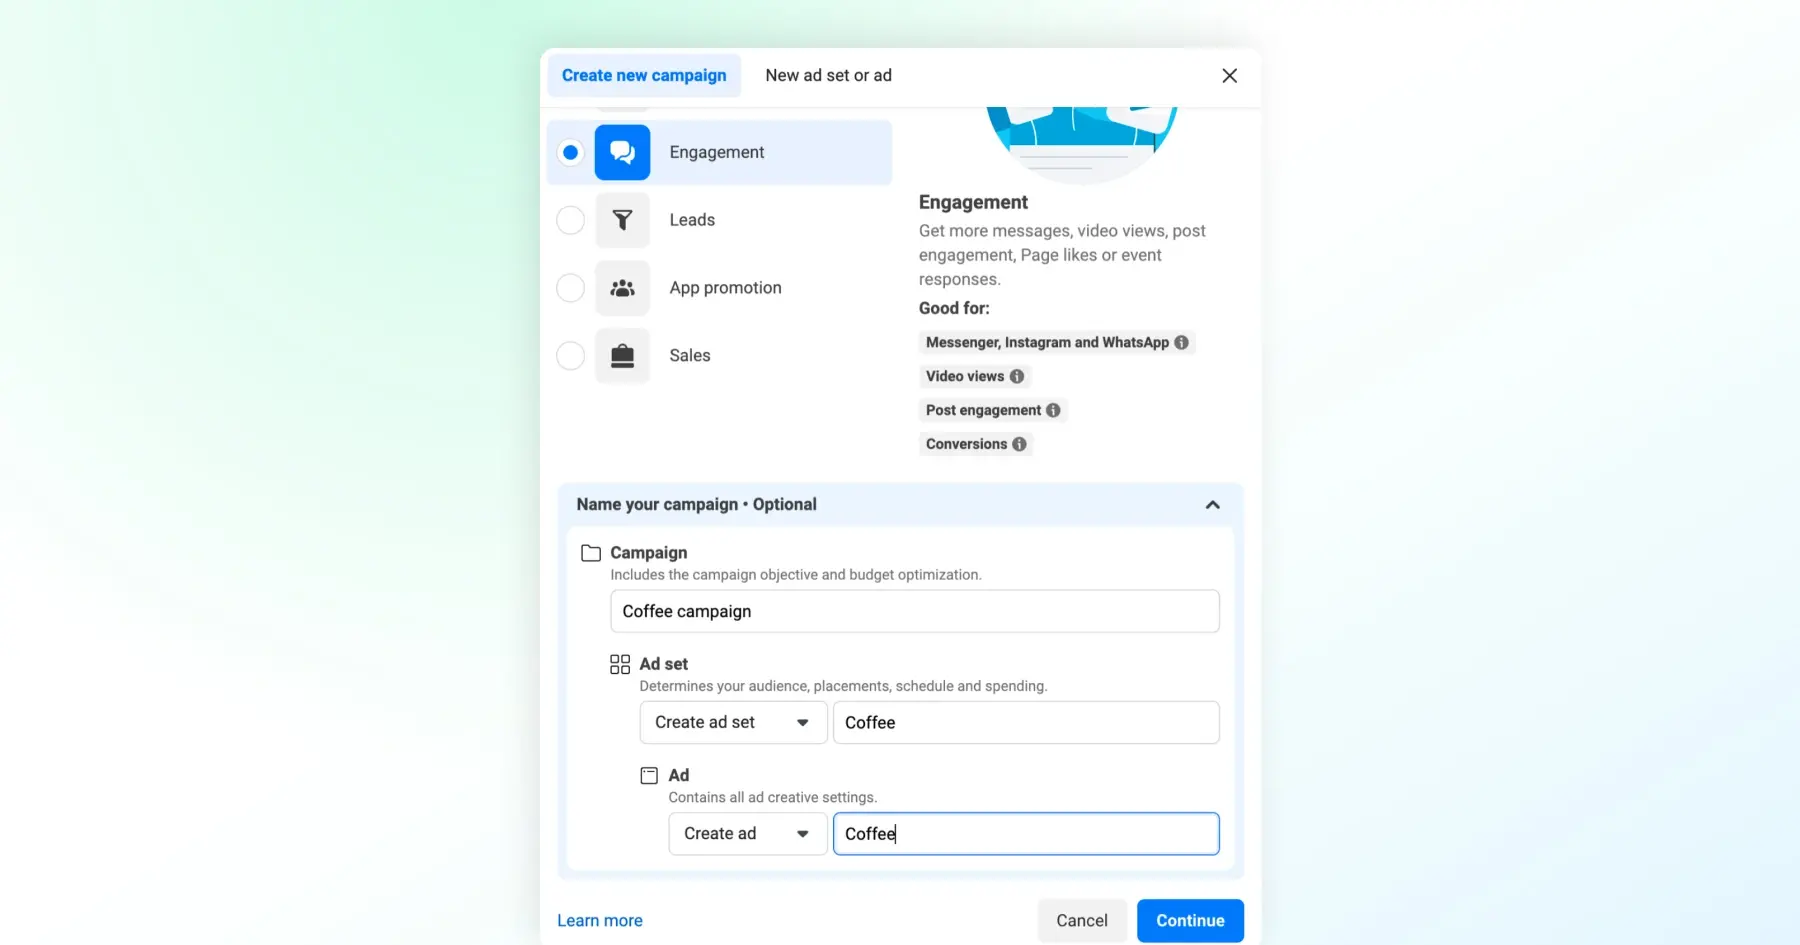
- At the objective screen, select Engagement.
This is the objective Wati's own setup is built around, and it's the one that unlocks conversations on WhatsApp, Messenger, and Instagram directly from the ad.
Note: Some Meta accounts also show a Leads objective as CTWA-compatible, optimizing for users likely to respond to qualifying questions rather than just start a chat. If you see it and want to test it, that's a Meta-side option, not something Wati's setup specifically depends on. Engagement is the one to default to.
Do not select Traffic. Traffic optimizes for link taps, not conversation starts, so Meta will show your ad to people likely to tap a button, not people likely to actually message you.
You'll see a cheaper cost per click and a worse cost per real conversation, which is the opposite of what a CTWA campaign is for.
Name your campaign, ad group, and ad set, and click Continue.
Step 2: Set the Conversion Location to WhatsApp
- At the ad set level, under Conversion location, select Messaging apps (some accounts show this as Messaging destinations).
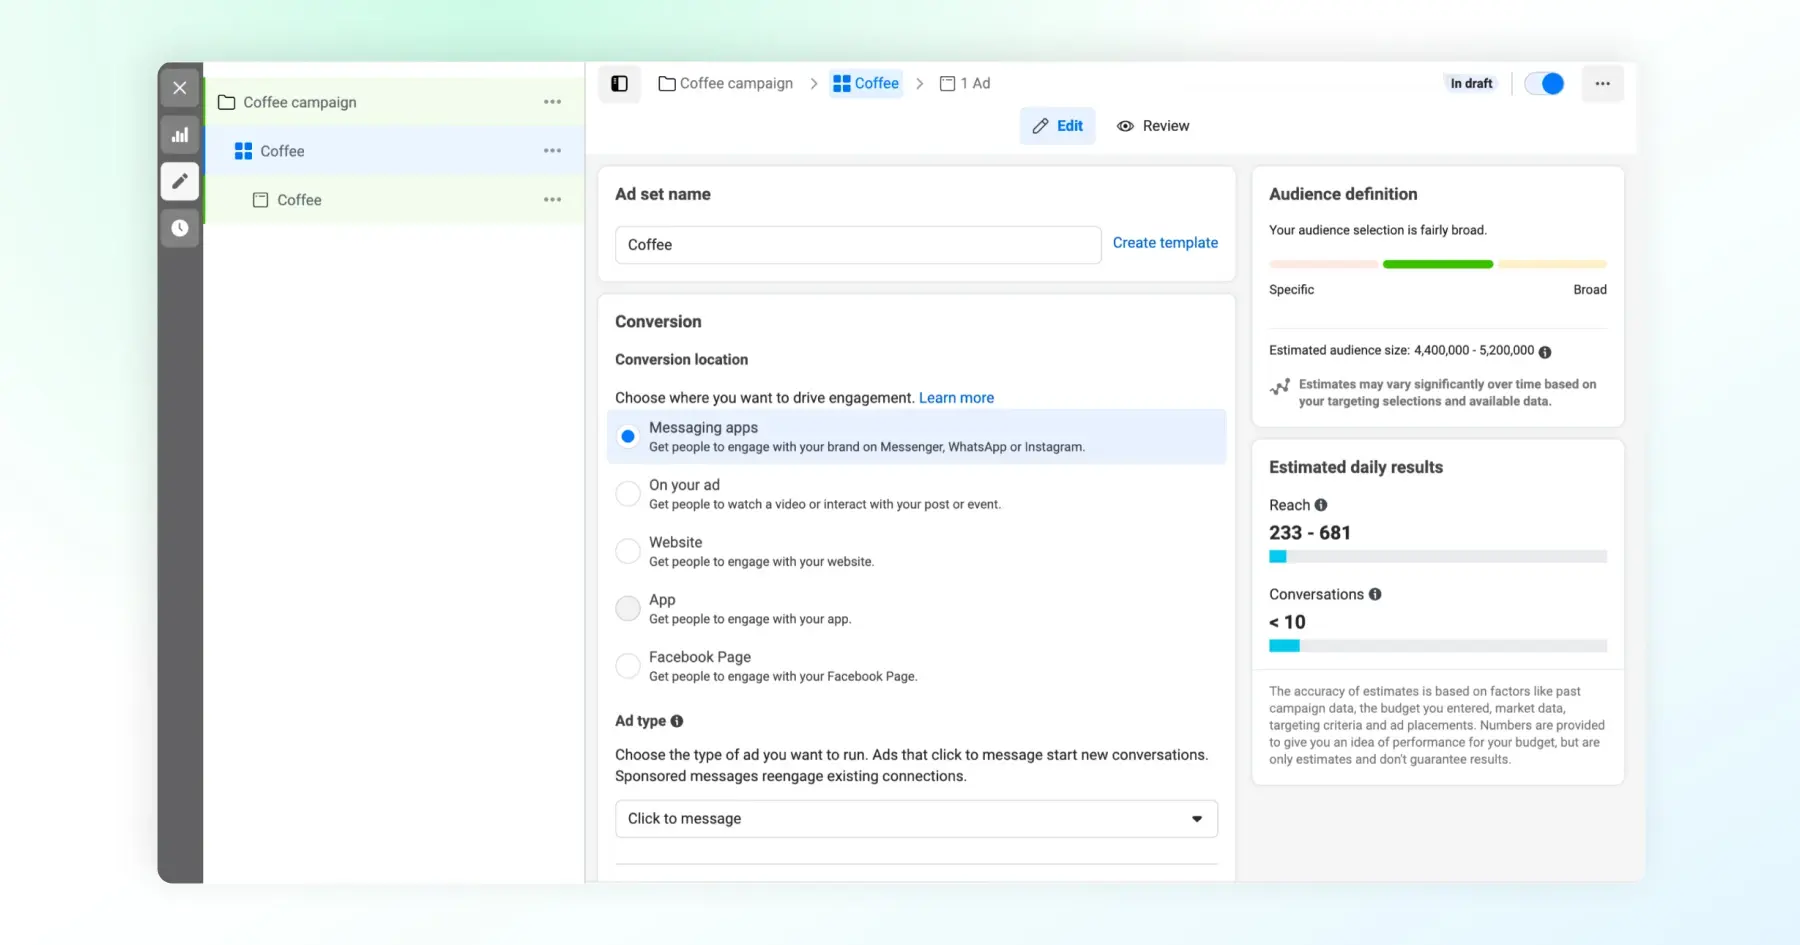
- Then choose WhatsApp from the list. If Messenger and Instagram are also checked by default, uncheck them so every conversation lands in one channel.
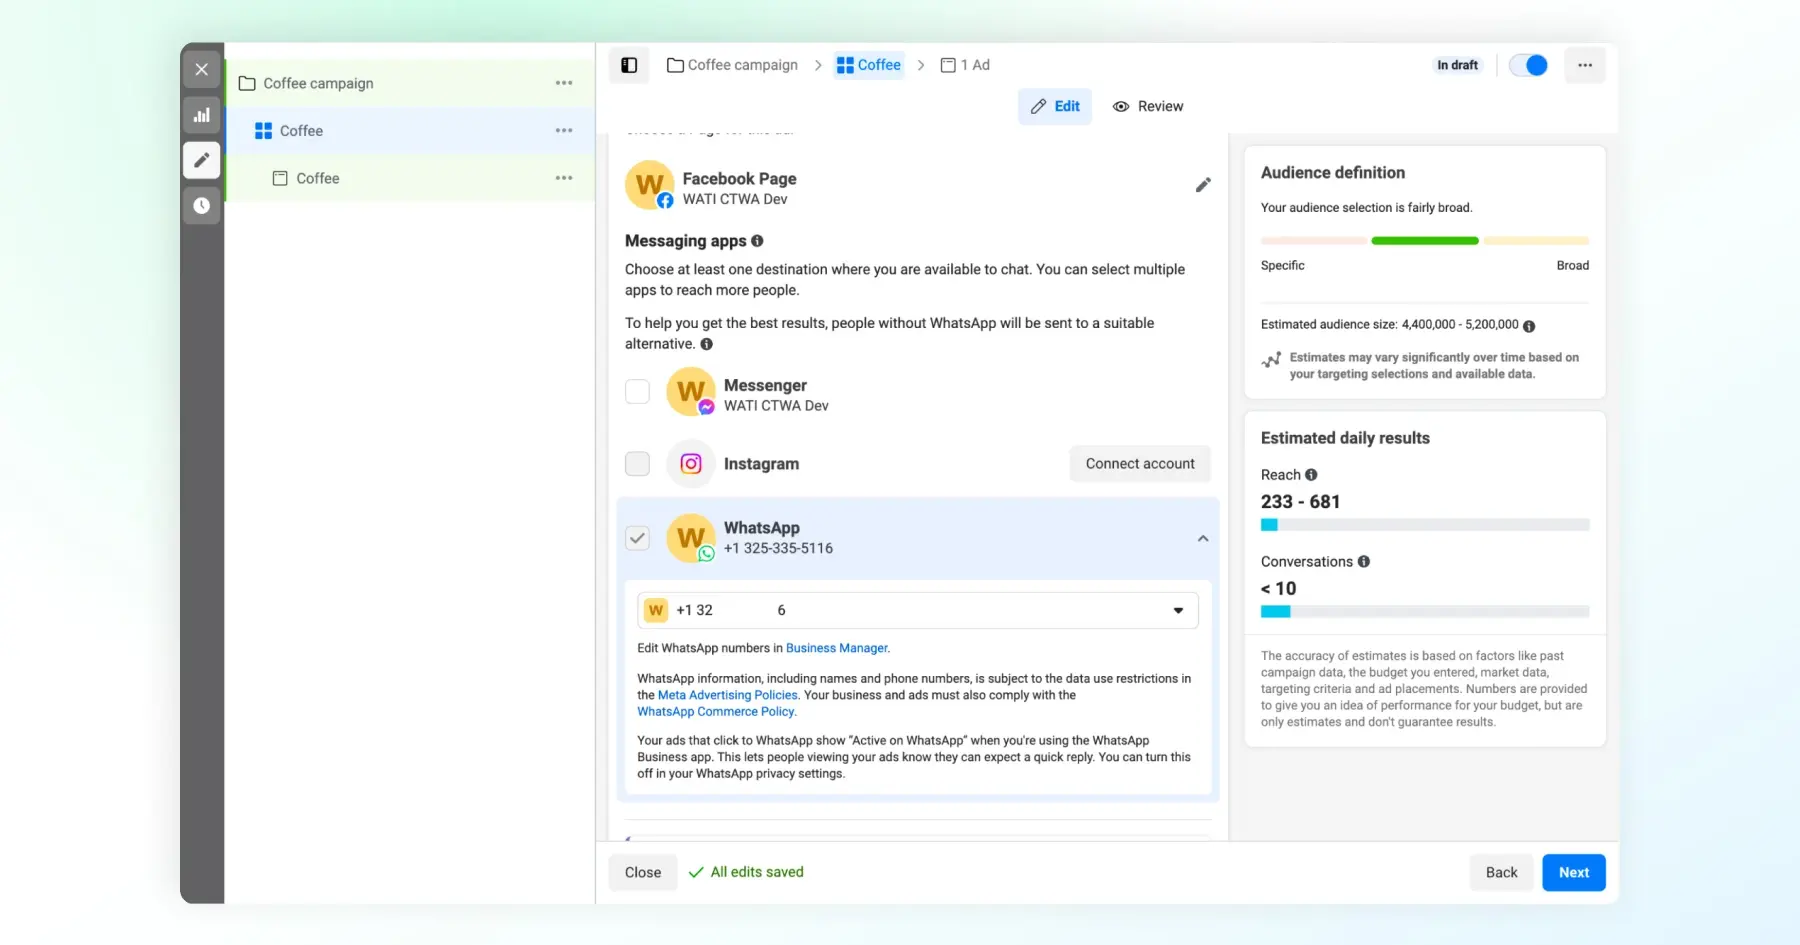
If you haven't linked a WhatsApp number yet, Ads Manager will prompt you to do it here. If you completed the requirements checklist earlier, you'll see your verified number in a dropdown instead.
Double-check that the correct number is selected before moving on. Picking the wrong number in a multi-brand or multi-market account won't throw an error; it'll just route conversations somewhere your team isn't watching.
Step 3: Set Your Budget and Schedule
Budget and scheduling work the same as any other Meta campaign:
- Choose a daily budget for a new or test campaign, since it's easier to pause and adjust while you're still learning what performs.
- Choose a lifetime budget for a fixed-window campaign, like a launch or a seasonal push, and let Meta pace spend across it.
- Run the ad set for at least 5 to 7 days before judging results. Messaging campaigns need enough delivery volume to exit Meta's learning phase.
Step 4: Set Your Audience
Define your audience by age, gender, location, and interests. CTWA campaigns generally respond well to broader targeting, since Meta's optimization for "likely to message" users needs enough volume to work with.
If you're retargeting, custom audiences built from website visitors or existing customer lists tend to perform well, since they already have some familiarity with your brand.
Step 5: Build the Ad Creative
Choose a message template or create a custom message, and add prompts to guide the conversation once someone opens the chat. Choose your CTA (Send Message or Chat on WhatsApp both work), upload your creative, and write your ad copy. Click Save and Finish.
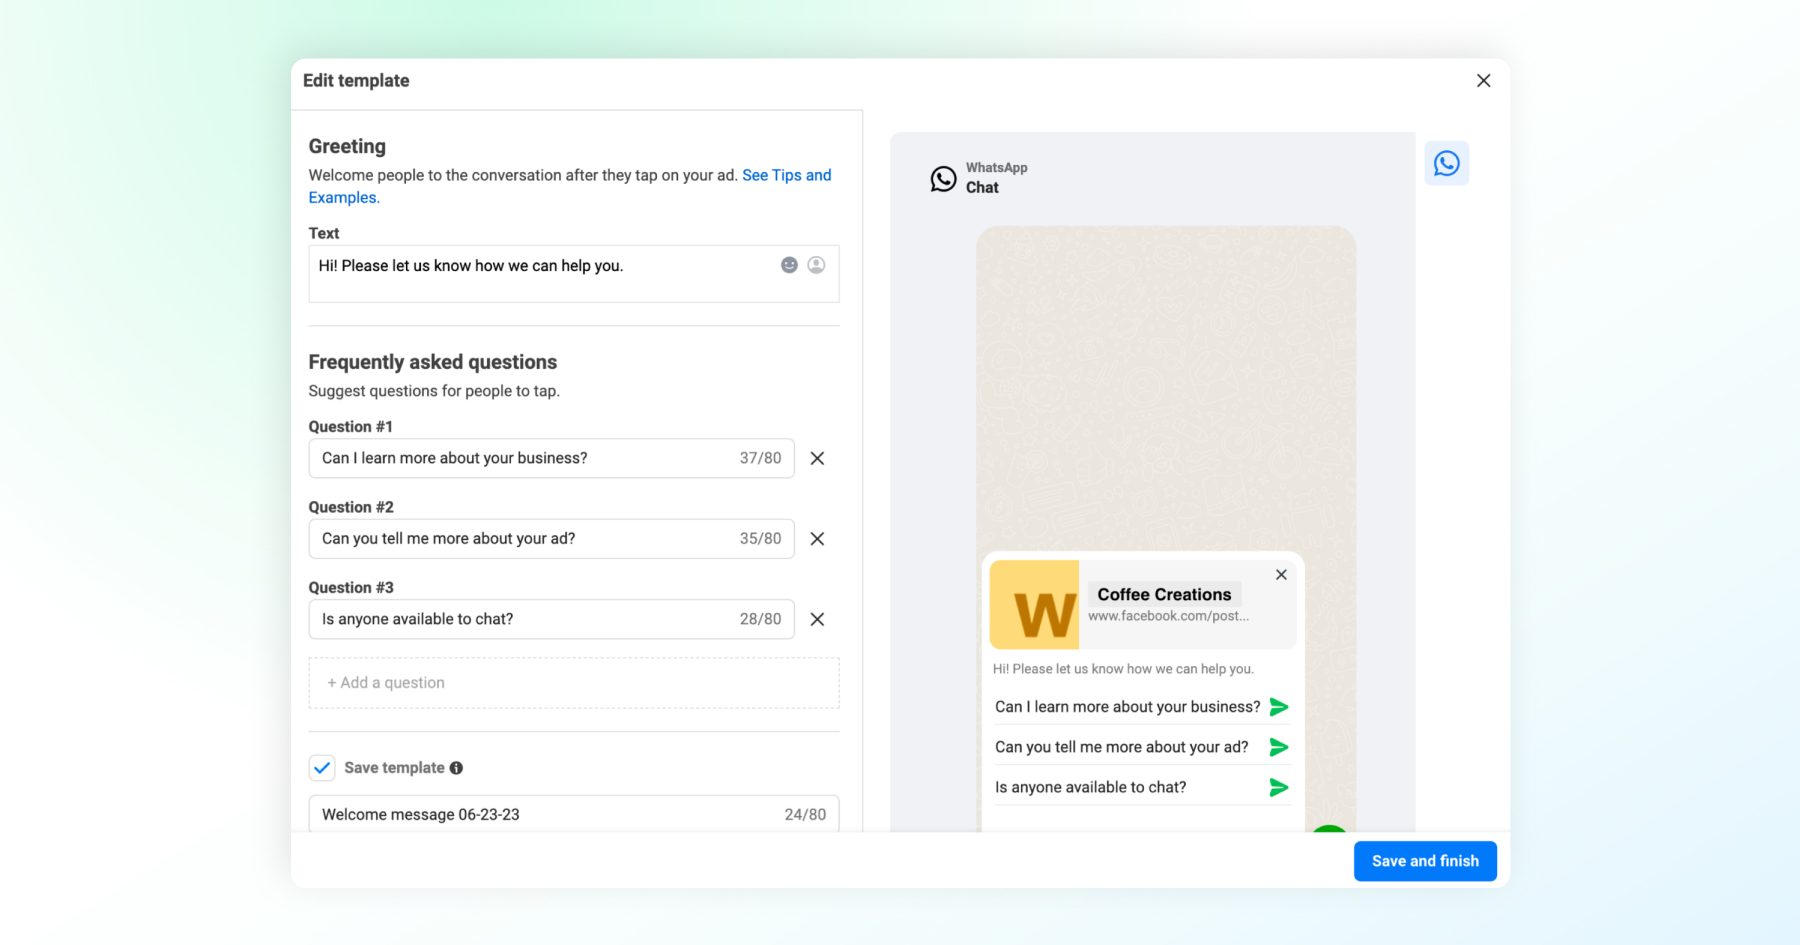
With objective, conversion location, budget, audience, and creative all set, there's one field left before you publish, and it's the one most setups get wrong: the message someone actually sees when WhatsApp opens.
How Do You Set Up the Conversation Opener?
The conversation opener is the pre-filled message a user sees the moment WhatsApp opens after they tap your ad. This is the step that decides whether a click turns into a real conversation, and it's the one most click-to-WhatsApp ad guides barely mention.
In the ad setup, below your creative fields, you'll find the Message Template section. Whatever you put here loads directly into the user's WhatsApp text field.
They can edit it, delete it, or just hit send as-is, but most people take the path of least resistance and send whatever's already there.
Meta's default pre-fill is usually something generic like "Hi, I'm interested." It works, technically, but it gives your team nothing to act on when the message lands.
A better opener does two things at once: it feels natural coming from the user, and it hands your team a starting point for the reply.
A few examples by business type:
- Service business: "Hi, I'd like to know more about [Service]. I'm looking for help with..."
- Product with variants: "Hi, I saw your ad for [Product]. Can you help me find the right option?"
- Time-sensitive offer: "Hi, I saw the offer in your ad. Is it still available?"
Write the opener the way an actual customer would type it, not the way a brand would. "Hi, my name is [NAME], I'm a [PROFESSION] earning [AMOUNT], and I'd like to discuss [TOPIC]" is not something anyone would send. Keep it short and low-effort to say yes to.
You can also add quick reply buttons so a user can tap instead of typing anything. These reduce friction meaningfully, especially on mobile, where typing even a short message is a real effort. For a home services business, for example:
- "I need a quote"
- "Tell me about your services"
- "What are your hours?"
Once your opener and quick replies are set, you're ready to publish. That's next, along with how to confirm the setup actually worked.
How Do You Publish and Confirm It's Working?
With your campaign, ad set, ad, and conversation opener all configured, publishing is the easy part. Confirming it actually worked is the part worth slowing down for.
Step 1: Publish and Wait for Review
Click Publish. Meta sends the ad through standard review, the same as any other Facebook or Instagram ad. Approval typically takes a few hours, occasionally longer. You'll get a notification either way: approved or rejected.
Step 2: Give it Time to Sync Before You Troubleshoot
Newly published CTWA ads can take up to 24 hours to sync with Wati. If you check your inbox right after approval and don't see the ad tagged yet, that's normal, not necessarily a broken setup. Give it the full sync window before you start troubleshooting.
Step 3: Check That WhatsApp Shows Up as the Destination
Once the ad is live and synced, open it from Ads Manager and confirm the CTA button reads Send Message or Chat on WhatsApp, and that tapping it (from a test device, not inside Ads Manager itself) opens WhatsApp with your conversation opener already loaded.
Step 4: Add the Right Columns to Measure It
In Ads Manager, go to Columns → Customize Columns → Messaging, and add:
- Messaging Conversations Started: Your primary metric. This is the number that tells you the setup is actually generating conversations, not just impressions or clicks.
- Cost Per Messaging Conversation Started: Your efficiency metric once you have enough volume to judge it.
- Messaging Reply Rate. The percentage of conversations that got a reply from your team. This one's on you, not Meta, and it's worth watching from day one.
Step 5: Confirm Conversations are Landing Where Your Team Can See Them
After the sync window has passed, send a test message yourself by tapping through your own live ad. Check that it shows up in your Wati team inbox, tagged to the right campaign.
If it doesn't land anywhere, or lands untagged, well past the 24-hour sync mark, that's a setup issue to fix before you scale spend, not after.
If everything above checks out, your click-to-WhatsApp ads campaign is technically live and measurable.
What Mistakes Break a CTWA Setup?
Most CTWA setups that underperform aren't broken in an obvious way. They publish fine, get approved, and quietly deliver worse results than they should, because of a handful of setup-stage mistakes that don't throw errors.
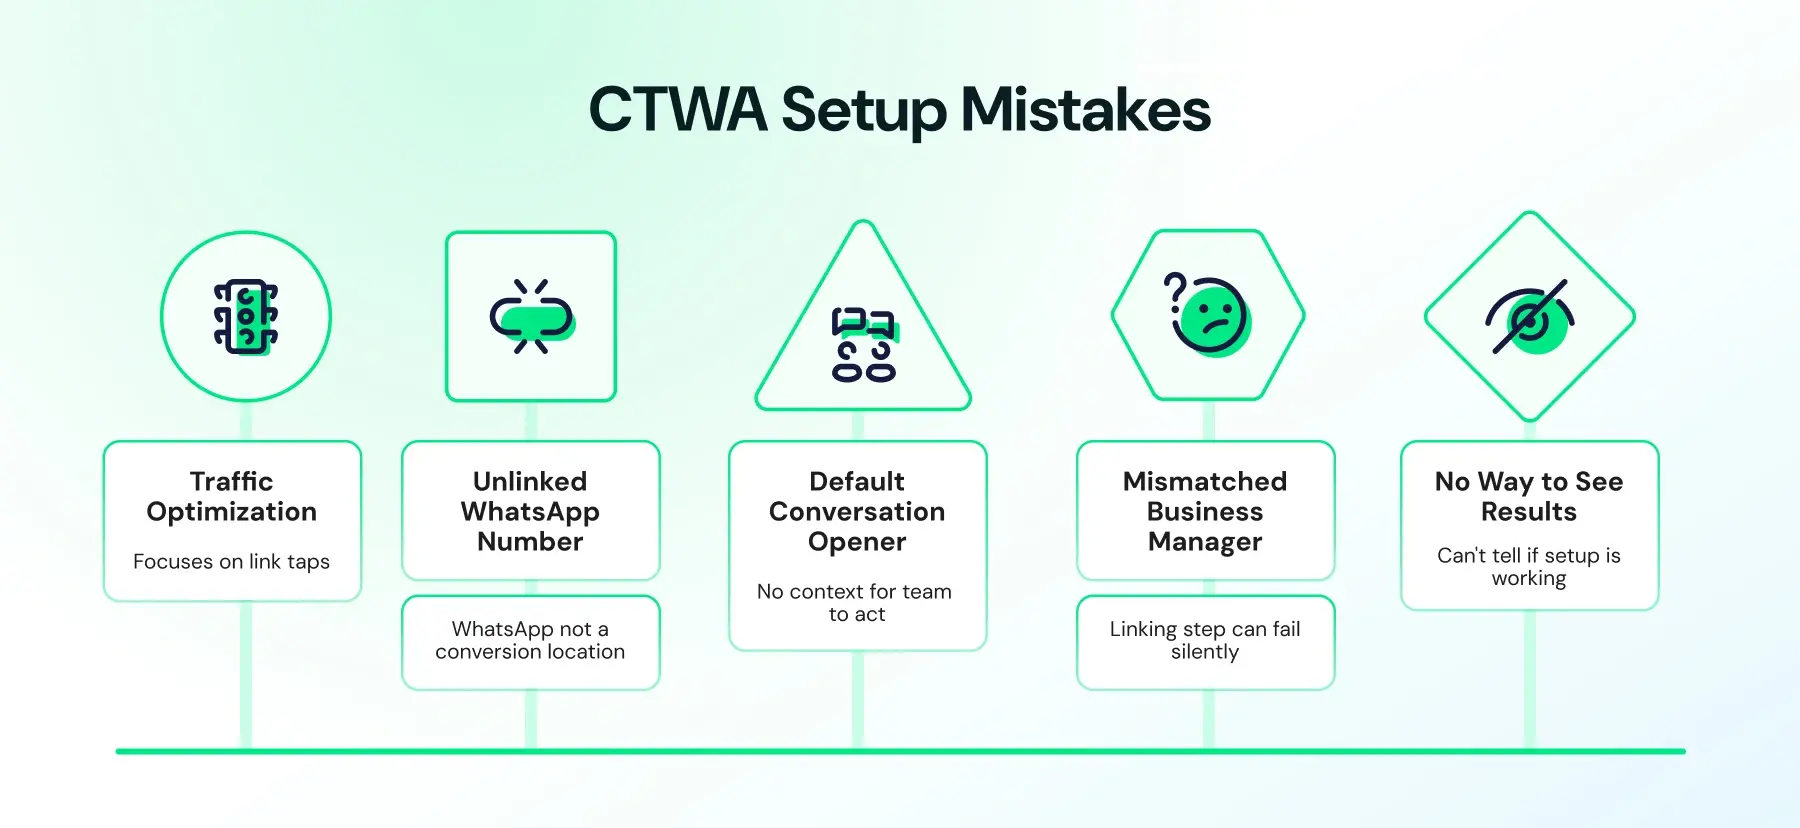
Mistake 1: Choosing Traffic Instead of Engagement or Leads
This is the most common one. Traffic optimizes for link taps, so Meta shows your ad to people likely to tap a button, not people likely to actually send a message.
You'll often see a lower cost per click and a worse cost per real conversation, which defeats the point of running click-to-WhatsApp ads in the first place.
Mistake 2: Publishing Before the WhatsApp Number is Linked and Verified
If your WhatsApp Business number isn't linked to the same Facebook Page and verified, WhatsApp won't appear as a conversion location at all, or worse, an old or wrong number sits selected in the dropdown, and nobody notices until conversations start going somewhere the team isn't watching.
Always double-check the number selected at the ad set level before you publish.
Mistake 3: Leaving the Conversation Opener on Meta's Default
Meta's default pre-filled message, "Hello! Can I get more info on this?", works fine as a fallback, but it gives your team nothing to act on when it lands.
A generic opener means every conversation starts from zero context, which slows down your team's first reply and quietly lowers reply rates.
Mistake 4: Mismatched Business Manager Accounts
If your WhatsApp Business account, Facebook Page, and ad account aren't all sitting under the same Meta Business Manager, the linking step can fail silently or require manual approval from a partner, holding up your entire setup at the account level before the campaign is even the problem.
Mistake 5: Launching With No Way to See If It Worked
Publishing without adding the Messaging columns, or without a plan for where CTWA conversations land in your inbox, means you can't tell whether the setup is actually working until you're well into spending. Confirm the metrics and the inbox routing before you scale the budget, not after.
Catch these five at setup time, and the rest of what determines whether a CTWA campaign performs, like reply speed and conversation quality, moves outside of setup entirely and into how your team runs the conversation itself.
Set Up Once, Then Let the Conversation Do the Work
That's the full setup: link and verify your WhatsApp Business account, choose Engagement or Leads over Traffic, route the ad set to WhatsApp, build a creative that makes the tap feel natural, and write a conversation opener your team can work with.
But setup only creates the opportunity. What happens in the first reply decides whether it becomes a real conversation. A well-configured campaign handed to a slow or generic response loses the same leads a poorly-configured one would, just for a different reason.
With Wati, that part gets easier too: every CTWA conversation lands in one shared team inbox, already tagged to its campaign, so nothing slips through while you're still learning what works.
Book a demo with Wati and see how a properly connected CTWA setup turns into conversations your team can actually keep up with.
Frequently asked questions
Which campaign objective should I use for click-to-WhatsApp ads?
Engagement or Leads. Engagement optimizes for conversation volume. Leads for higher-quality responses. Avoid Traffic, as it optimizes for clicks, not conversations.
Do I need the WhatsApp Business API to create click-to-WhatsApp ads?
No. The free WhatsApp Business app works fine at low volume. The API's worth it once you need automation, CRM routing, or more conversations than a person can reply to manually.
Why isn't WhatsApp showing up as a conversion location in Ads Manager?
Usually, because your WhatsApp number isn't linked and verified on the same Facebook Page, or your accounts sit under different Meta Business Managers. Fix the link and the option appears.
Can I run click-to-WhatsApp ads on Instagram too?
Yes. The same campaign setup runs across both Facebook and Instagram placements. No separate campaign needed.
How long does it take for a new click-to-WhatsApp ad to go live?
Review usually takes a few hours. Once approved, give it 5 to 7 days before judging performance, since messaging campaigns need time to exit the learning phase.
Related posts
- How to Use an Instagram Chatbot for FAQ Automation (2026 Guide)
An Instagram chatbot replies to DMs, comments, and story replies instantly using keyword triggers, then hands off to a human when needed. Here's how to set one up in Wati.
- Instagram Auto Reply: How to Set It Up and Automate DMs (2026 Guide)
Instagram auto-reply sends instant responses to DMs and comments: welcome messages, OOO replies, keyword triggers, and comment-to-DM. Here's how to set it up and stop losing leads to slow replies.
- WhatsApp Verification Explained: How to Get Blue Tick in WhatsApp
Discover how WhatsApp verification boosts trust and credibility. Get insights into timelines, steps, and how Wati makes the process seamless for businesses.
- TikTok Business Account vs. Personal Account: How Do They Differ?
TikTok Business Account vs Personal Account: Business unlocks ads, analytics, and messaging; Personal keeps sounds and creator payouts.